Google Cloud Console Setup
This guide walks you through creating the Google OAuth credentials required for OneTap Login to work. The process takes about 5-10 minutes.
Google Cloud Console is free to use for OAuth authentication. You don't need to add billing information or pay anything.
Overview
You'll need to:
- Create a Google Cloud project
- Configure the OAuth consent screen
- Create OAuth 2.0 credentials
- Add your domain as authorized origin
- Copy the Client ID to the plugin
Step 1: Access Google Cloud Console
- Go to Google Cloud Console
- Sign in with your Google account (any Google account works)
Step 2: Create a New Project
- Click the project dropdown at the top of the page
- Click New Project
- Enter a project name (e.g., "My WooCommerce Store")
- Click Create
- Wait for the project to be created (a few seconds)
- Make sure the new project is selected
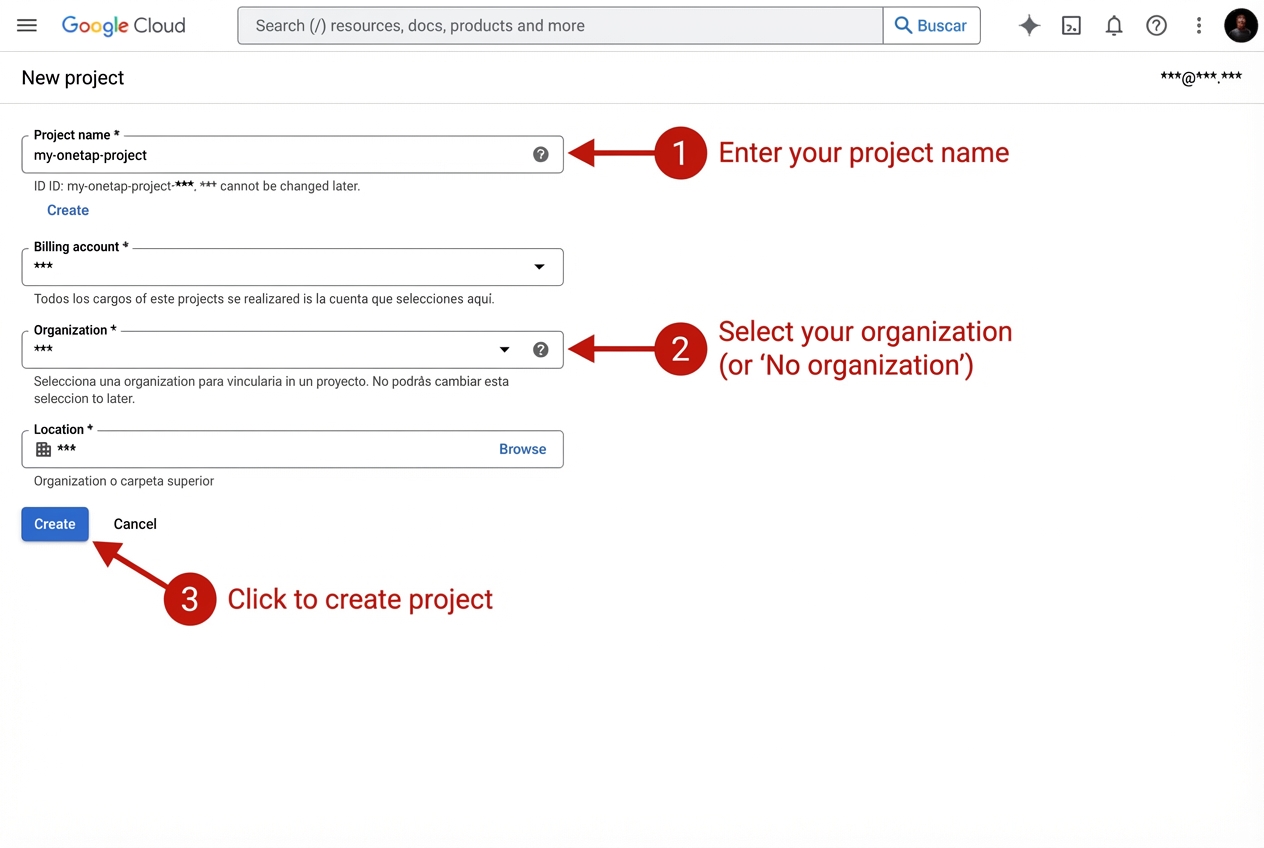
Use a descriptive name like "YourStoreName OAuth" so you can identify it later.
Step 3: Configure OAuth Consent Screen
Before creating credentials, you must configure the OAuth consent screen.
3.1: Access OAuth Consent Screen
- In the left sidebar, click APIs & Services
- Click OAuth consent screen
3.2: Select User Type
- Select External (unless you have Google Workspace and want internal only)
- Click Create
- External: Anyone with a Google account can use it (required for most websites)
- Internal: Only users in your Google Workspace organization (business/enterprise only)
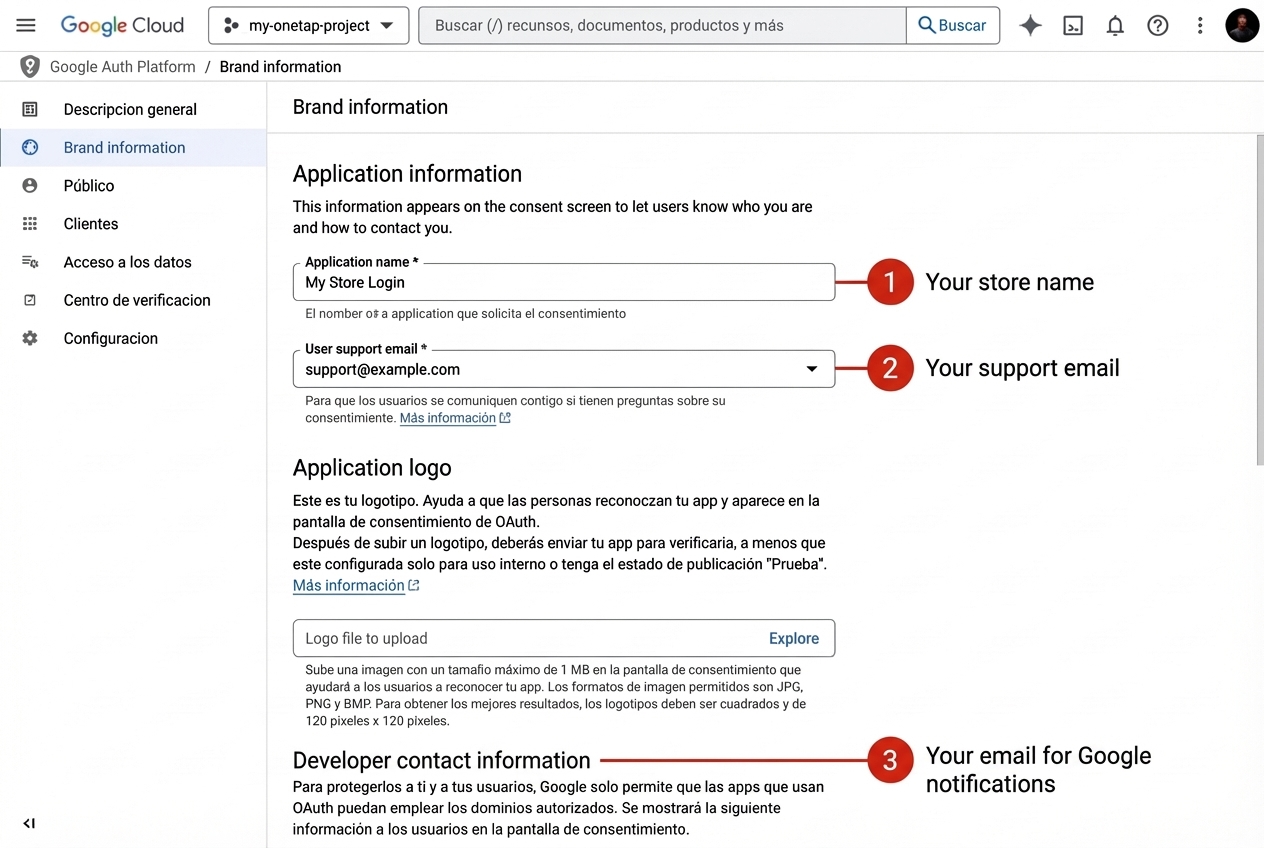
3.3: Fill in App Information
App name: Your store name (e.g., "My WooCommerce Store")
User support email: Your email address
App logo: Optional (can skip)
App domain:
- Application home page:
https://yourdomain.com - Application privacy policy:
https://yourdomain.com/privacy - Application terms of service:
https://yourdomain.com/terms
These URLs are shown on Google's consent screen. Use your actual privacy and terms pages.
Developer contact information: Your email address
Click Save and Continue
3.4: Scopes (Permissions)
- Click Add or Remove Scopes
- Select these scopes:
email- See your primary email addressprofile- See your personal infoopenid- Associate you with your personal info
- Click Update
- Click Save and Continue
3.5: Test Users (Optional)
For testing before verification:
- Click Add Users
- Add email addresses of test users
- Click Save and Continue
3.6: Summary
- Review your settings
- Click Back to Dashboard
Step 4: Create OAuth Credentials
Now create the actual credentials:
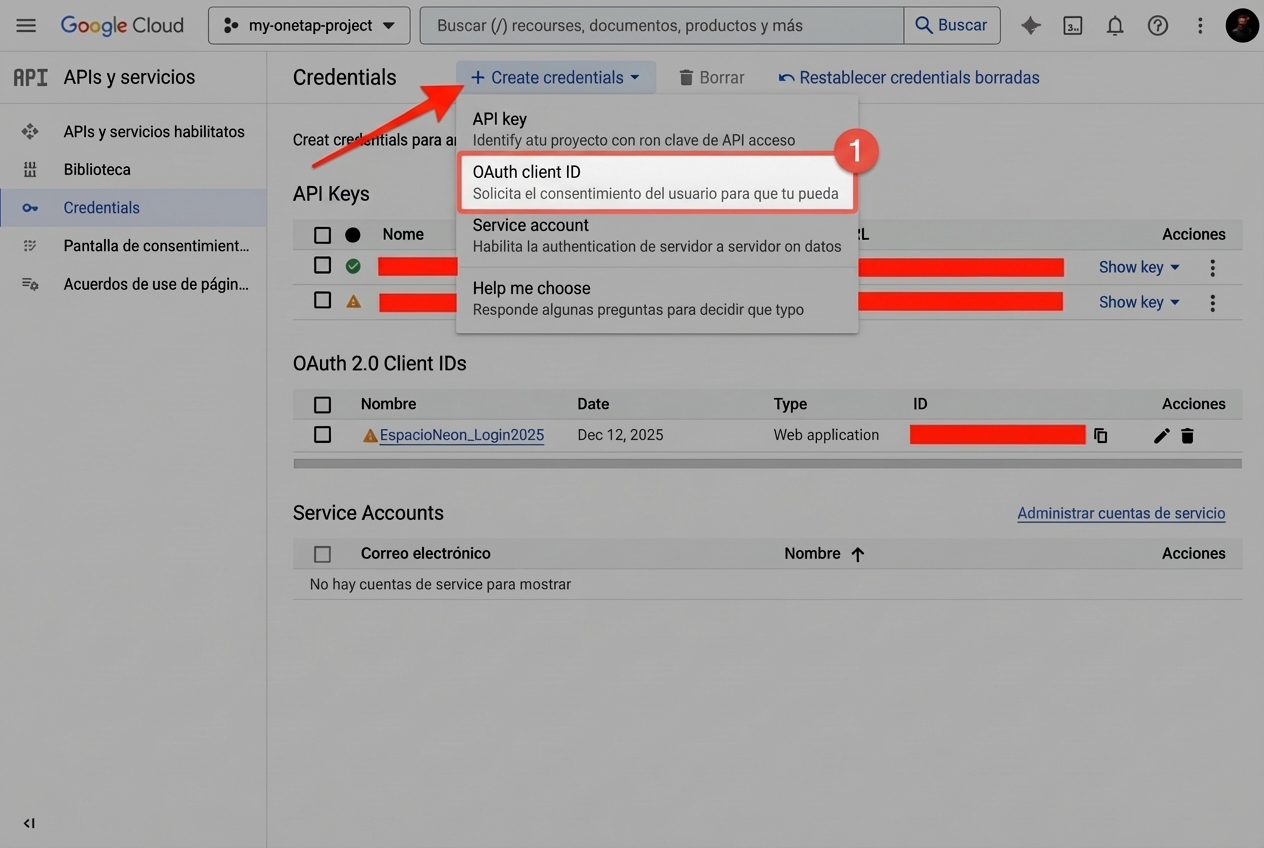
4.1: Access Credentials Page
- In the left sidebar, click Credentials
- Click Create Credentials at the top
- Select OAuth client ID
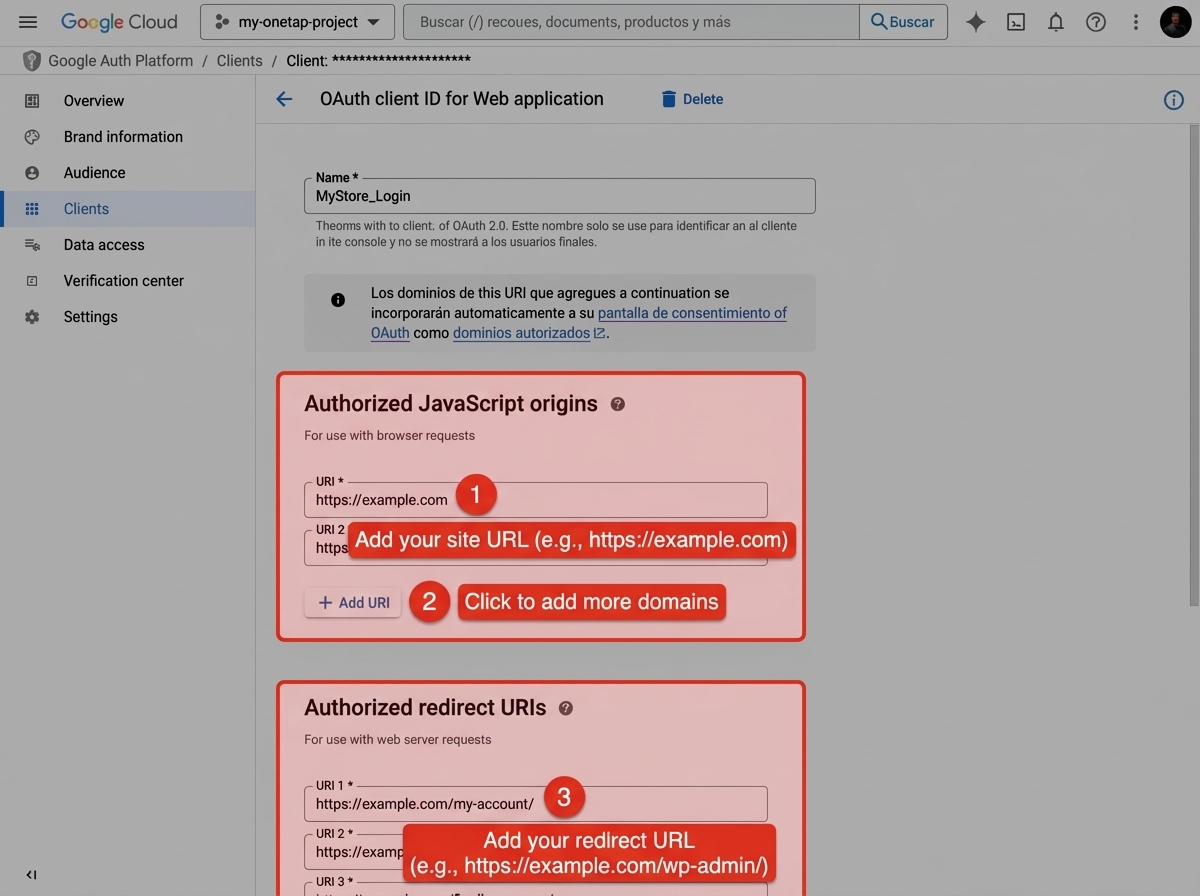
4.2: Configure OAuth Client
Application type: Select Web application
Name: Enter a name (e.g., "WooCommerce OneTap Login")
4.3: Add Authorized JavaScript Origins
This tells Google which domains can use these credentials.
Click Add URI under "Authorized JavaScript origins" and add:
https://yourdomain.com
Replace yourdomain.com with your actual domain. Include the full URL with https://.
If you have multiple domains (e.g., www and non-www), add both:
https://yourdomain.com
https://www.yourdomain.com
For local development (optional):
http://localhost
http://localhost:8080
4.4: Add Authorized Redirect URIs
Click Add URI under "Authorized redirect URIs" and add:
https://yourdomain.com/wp-json/onetap/v1/callback
https://yourdomain.com
- The
/wp-json/onetap/v1/callbackis for the OAuth callback - The plain domain is for One Tap popup authentication
4.5: Create the Credentials
- Click Create
- A popup appears with your credentials
- Copy the Client ID (you'll need this)
- The Client Secret is shown but not required for this plugin
Copy your Client ID somewhere safe. It looks like:
123456789012-abcdefghijklmnopqrstuvwxyz123456.apps.googleusercontent.com
Step 5: Enable Required APIs
You may need to enable the Google Identity Toolkit API:
- Go to APIs & Services > Library
- Search for "Identity Toolkit API"
- Click on it and click Enable

Also enable:
- People API (for profile information)
Step 6: Verify Your Setup
Before continuing to plugin configuration, verify:
- Project created and selected
- OAuth consent screen configured
- OAuth credentials created (Web application type)
- Your domain added to JavaScript origins
- Callback URL added to redirect URIs
- Client ID copied
Common Setup Issues
"Error 400: redirect_uri_mismatch"
Cause: The redirect URI in Google Cloud doesn't match your site URL.
Solution:
- Go to Credentials in Google Cloud Console
- Click on your OAuth client
- Verify the redirect URIs exactly match:
https://yourdomain.com/wp-json/onetap/v1/callbackhttps://yourdomain.com
- Check for typos, trailing slashes, www vs non-www
"Error 403: access_denied"
Cause: OAuth consent screen not properly configured.
Solution:
- Complete all required fields in OAuth consent screen
- Add test users if in "Testing" mode
- Make sure the requesting user is a test user
"Error: The OAuth client was not found"
Cause: Wrong Client ID or credentials deleted.
Solution:
- Verify you copied the complete Client ID
- Check if credentials still exist in Google Cloud Console
- Create new credentials if needed
"idpiframe_initialization_failed"
Cause: Domain not authorized or HTTPS issue.
Solution:
- Verify your domain is in "Authorized JavaScript origins"
- Ensure you're using HTTPS (not HTTP)
- Check for mixed content warnings
Publishing Your App
Testing Mode
By default, your app is in "Testing" mode:
- Only test users you add can use it
- Shows "Google hasn't verified this app" warning
- Limited to 100 test users
Production Mode
To remove restrictions:
- Go to OAuth consent screen
- Click Publish App
- Confirm publishing
For basic authentication (email, profile), you don't need to go through Google's verification process. Just click "Publish App" and it will work for all users.
Security Best Practices
Protect Your Client ID
- Don't share your Client ID publicly
- Don't commit it to version control
- Use environment variables in production
Restrict Your Credentials
In Google Cloud Console:
- Go to Credentials
- Click your OAuth client
- Under "Authorized JavaScript origins", only add domains you control
- Remove localhost origins for production sites
Monitor Usage
- Go to APIs & Services > Dashboard
- Monitor API usage and errors
- Set up alerts for unusual activity
Next Steps
Now that you have your Google credentials:
- Configure the Plugin - Enter your Client ID
- Verify Everything Works - Test the connection
Quick Reference
| Field | Value |
|---|---|
| Application type | Web application |
| Authorized JavaScript origin | https://yourdomain.com |
| Authorized redirect URI | https://yourdomain.com/wp-json/onetap/v1/callback |
| Required scopes | email, profile, openid |