First Configuration
After installing the plugin and creating your Google Cloud credentials, it's time to configure the plugin. This guide walks you through entering your credentials and making your first test.
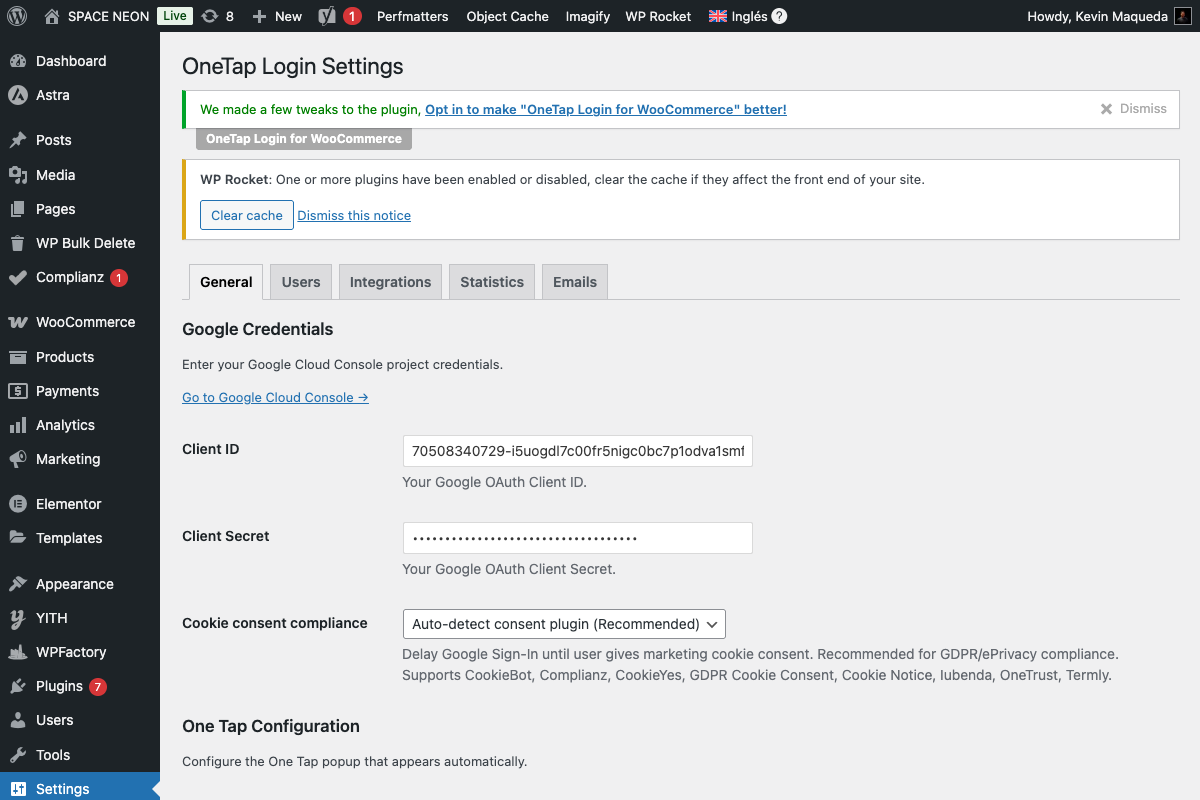
Step 1: Access Plugin Settings
- In your WordPress admin, go to Settings > OneTap Login
- You'll see the plugin settings page with multiple tabs

Step 2: Enter Google Credentials
2.1: Locate the API Section
In the General tab, find the API Credentials section at the top.
2.2: Enter Client ID
- Paste your Google Client ID in the Client ID field
- The Client ID looks like:
123456789012-abcdefghijklmnopqrstuvwxyz123456.apps.googleusercontent.com
2.3: Enter Client Secret (Optional)
- Paste your Client Secret in the Client Secret field
- The Client Secret looks like:
GOCSPX-abcdefghijklmnopqrstuvwxyz12
The Client Secret is only required for certain advanced features. Google One Tap works with just the Client ID. However, we recommend entering both for full functionality.
2.4: Save Settings
Click Save Changes at the bottom of the page.
Step 3: Configure Basic Options
Before testing, review these essential settings:
Enable One Tap
In the One Tap Configuration section:
- Ensure Enable One Tap is checked
- This activates the popup that appears automatically for logged-in Google users
Enable Sign-In Button
In the Button Configuration section:
- Check Enable on My Account page
- This displays the "Sign in with Google" button on WooCommerce login forms
For your first test, enable both One Tap and the button. You can fine-tune later.
Step 4: Test Connection
The plugin includes a built-in diagnostic tool to verify your configuration.
4.1: Locate Test Button
In the API Credentials section, find the Test Connection button.
4.2: Run the Test
- Click Test Connection
- Wait a few seconds for the results
- A panel will expand showing 5 diagnostic checks
4.3: Understand the Results
| Check | What It Tests | Expected Result |
|---|---|---|
| Client ID Format | ID matches Google format | ✅ Valid |
| Client Secret Format | Secret matches Google format | ✅ Valid (or skipped) |
| HTTPS | Site uses SSL certificate | ✅ Enabled |
| REST API | WordPress REST API accessible | ✅ Available |
| Google Connection | Can reach Google servers | ✅ Connected |
4.4: All Green?
If all 5 checks show green checkmarks, your configuration is correct. Proceed to Verification for live testing.
4.5: Red or Yellow Results?
See the Troubleshooting section below.
Step 5: Review Default Settings
These settings are pre-configured with sensible defaults, but review them:
User Registration
| Setting | Default | Description |
|---|---|---|
| Auto-register users | Enabled | Creates new accounts for first-time Google users |
| Default role | Customer | Role assigned to new Google users (Subscriber if no WooCommerce) |
Button Appearance
| Setting | Default | Description |
|---|---|---|
| Button text | "Continue with Google" | Text displayed on the button |
| Theme | Filled Blue | Button color scheme |
| Shape | Pill | Rounded or rectangular |
Cookie Consent
| Setting | Default | Description |
|---|---|---|
| Respect cookie consent | Auto-detect | Waits for user consent if a consent plugin is detected |
Step 6: Save and Prepare to Test
- Review all settings
- Click Save Changes
- Proceed to Verification for live testing
Troubleshooting Connection Issues
Client ID Format Invalid
Symptoms: Red X on Client ID check
Solutions:
- Verify you copied the entire Client ID
- Check for extra spaces before or after
- Ensure it ends with
.apps.googleusercontent.com - Go back to Google Cloud Console and copy again
Client Secret Format Invalid
Symptoms: Red X on Client Secret check
Solutions:
- Client Secret starts with
GOCSPX- - Verify complete copy (no truncation)
- Leave blank if not using features requiring it
HTTPS Not Enabled
Symptoms: Red X on HTTPS check
Solutions:
- Install an SSL certificate (required by Google)
- Contact your hosting provider for SSL setup
- Use a service like Cloudflare for free SSL
- Update WordPress URLs to use
https://
Google requires HTTPS for all OAuth implementations. There is no way to use this plugin without SSL.
REST API Unavailable
Symptoms: Red X on REST API check
Solutions:
- Check if a security plugin blocks REST API
- Add exception for
/wp-json/onetap/endpoint - Verify permalink settings (Settings > Permalinks)
- Try resaving permalinks
Google Connection Failed
Symptoms: Red X on Google Connection check
Solutions:
- Check your server's internet connection
- Verify firewall allows outbound HTTPS (port 443)
- Check if
accounts.google.comis accessible - Contact hosting provider about external API access
Settings Reference
Here's a complete reference of settings available in the General tab:
API Credentials Section
| Field | Required | Description |
|---|---|---|
| Client ID | Yes | Your Google OAuth Client ID |
| Client Secret | No | Your Google OAuth Client Secret |
| Test Connection | - | Button to run diagnostics |
One Tap Configuration
| Field | Default | Description |
|---|---|---|
| Enable One Tap | Yes | Show automatic popup |
| Auto-select | No | Auto-select account if only one |
| Cancel on tap outside | Yes | Close popup when clicking elsewhere |
Button Configuration
| Field | Default | Description |
|---|---|---|
| Enable on My Account | Yes | Show button on WooCommerce login |
| Enable on wp-login.php | No | Show button on WordPress login |
| Button text | continue_with | "Continue with Google" text |
| Theme | filled_blue | outline, filled_blue, filled_black |
| Shape | pill | pill or rectangular |
Cookie Consent
| Field | Default | Options |
|---|---|---|
| Respect cookie consent | auto_detect | disabled, auto_detect, always_require |
Next Steps
Once your connection test passes:
- Verify the installation - Test with a real Google account
- Customize button appearance - Match your site design
- Configure user settings - Set roles and registration options
Quick Checklist
Before moving on, verify:
- Client ID entered correctly
- Client Secret entered (optional but recommended)
- Settings saved
- Test Connection shows all green
- One Tap enabled
- Sign-In Button enabled on desired pages