General Settings
The General tab contains the core configuration options for OneTap Login. This guide explains every setting in detail.
Accessing General Settings
- Go to Settings > OneTap Login in WordPress admin
- The General tab is selected by default

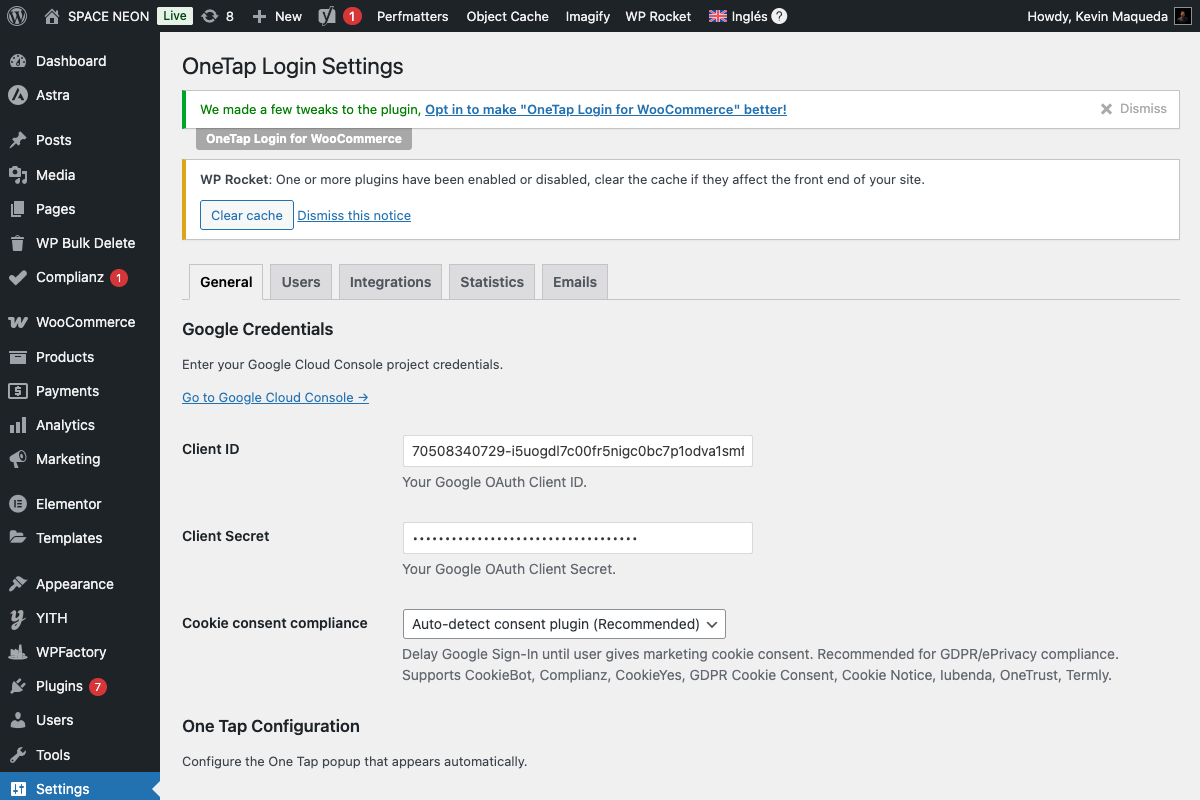
API Credentials Section
This section contains your Google OAuth credentials and the connection test tool.
Client ID
Field: Client ID
Required: Yes
Your Google OAuth 2.0 Client ID from Google Cloud Console.
Format:
123456789012-abcdefghijklmnopqrstuvwxyz123456.apps.googleusercontent.com
Notes:
- Must be from a "Web application" credential type
- Obtained from Google Cloud Console
- See Google Cloud Setup for creation steps
Client Secret
Field: Client Secret
Required: No (but recommended)
Your Google OAuth 2.0 Client Secret.
Format:
GOCSPX-abcdefghijklmnopqrstuvwxyz12
Notes:
- Optional for basic One Tap functionality
- Required for some advanced features
- Keep this value secure—don't share publicly
Never expose your Client Secret in client-side code, public repositories, or error messages.
Test Connection
Button: Test Connection
Runs 5 diagnostic checks to verify your configuration:
| Check | Description |
|---|---|
| Client ID Format | Validates ID matches Google's pattern |
| Client Secret Format | Validates secret format (if provided) |
| HTTPS | Confirms site uses SSL |
| REST API | Tests WordPress REST endpoint availability |
| Google Connection | Verifies server can reach Google |

Cookie Consent Section
Controls how the plugin interacts with cookie consent plugins.
Respect Cookie Consent
Field: Respect cookie consent
Default: Auto-detect
| Option | Behavior |
|---|---|
| Disabled | Always show One Tap regardless of consent |
| Auto-detect | Detect consent plugins and wait for consent |
| Always require | Always require explicit consent before showing |
Auto-detect supports 9 plugins:
- CookieBot
- Complianz
- GDPR Cookie Consent (WebToffee)
- Cookie Notice
- CookieYes
- Iubenda
- OneTrust
- Termly
- WP Consent API
For EU websites, use "Auto-detect" or "Always require" to ensure GDPR compliance.
See Cookie Consent Integration for detailed configuration.
One Tap Configuration Section
Settings for the Google One Tap popup.
Enable One Tap
Field: Enable One Tap
Default: Enabled
When enabled:
- Popup appears automatically for signed-in Google users
- Displays in the corner of the screen
- Single-click login without redirects
When disabled:
- Only the Sign-In Button is available
- No automatic popup shown
Additional One Tap Options
These settings fine-tune the One Tap behavior:
| Setting | Default | Description |
|---|---|---|
| Auto-select | Off | Automatically select account if only one exists |
| Cancel on tap outside | On | Close popup when user clicks elsewhere |
| Prompt parent ID | (empty) | Custom container element for the popup |
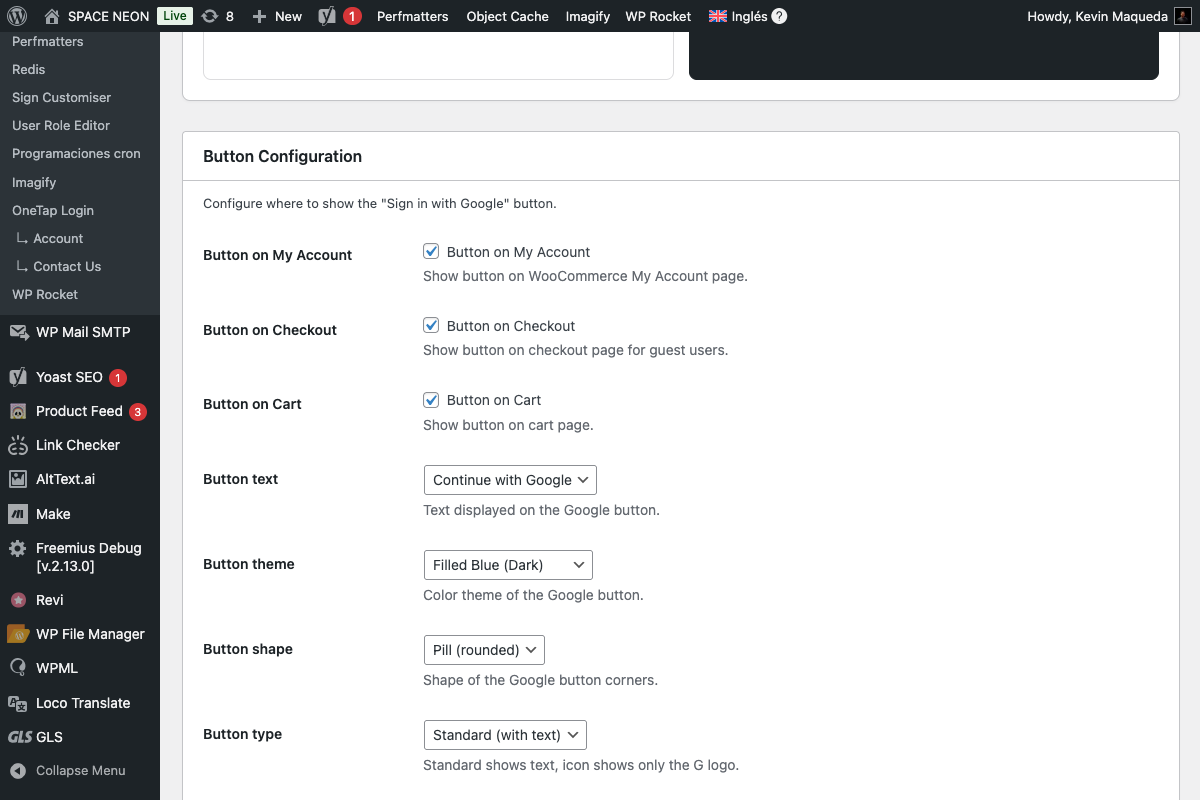
Button Configuration Section
Settings for the "Sign in with Google" button.
Button Display Locations
| Setting | Default | Description |
|---|---|---|
| Enable on My Account | On | Show button on WooCommerce My Account page |
| Enable on Checkout | Off | Show button on Checkout page (PRO) |
| Enable on Cart | Off | Show button on Cart page (PRO) |
| Enable on wp-login.php | Off | Show button on WordPress login page |
Button Appearance
| Setting | Default | Options |
|---|---|---|
| Button text | continue_with | continue_with, signin_with, signup_with, signin |
| Theme | filled_blue | outline, filled_blue, filled_black |
| Shape | pill | pill, rectangular |
Button Text Options
| Value | Displayed Text |
|---|---|
continue_with | "Continue with Google" |
signin_with | "Sign in with Google" |
signup_with | "Sign up with Google" |
signin | "Sign in" |
Button Theme Options
| Theme | Description |
|---|---|
outline | White background with gray border |
filled_blue | Google blue background (#4285F4) |
filled_black | Black/dark background |
Button Shape Options
| Shape | Description |
|---|---|
pill | Rounded corners (modern look) |
rectangular | Square corners (traditional look) |
See Button Customization for detailed styling options.
Button Preview Panel
The settings page includes a live preview panel showing how your button will appear.
Features:
- Real-time updates as you change settings
- Shows button on light and dark backgrounds
- Displays actual Google button (not mockup)
Error Messages Section
Customize the error messages shown to users.
Available Error Messages
| Error Type | Default Message | When Shown |
|---|---|---|
| Access Denied | "Access was denied. Please try again." | User denies permission |
| Popup Closed | "The sign-in popup was closed." | User closes popup before completing |
| Network Error | "Network error. Please check your connection." | Connection issue |
| Email Exists | "This email is already registered." | Email conflict |
| Generic Error | "An error occurred. Please try again." | Unexpected errors |
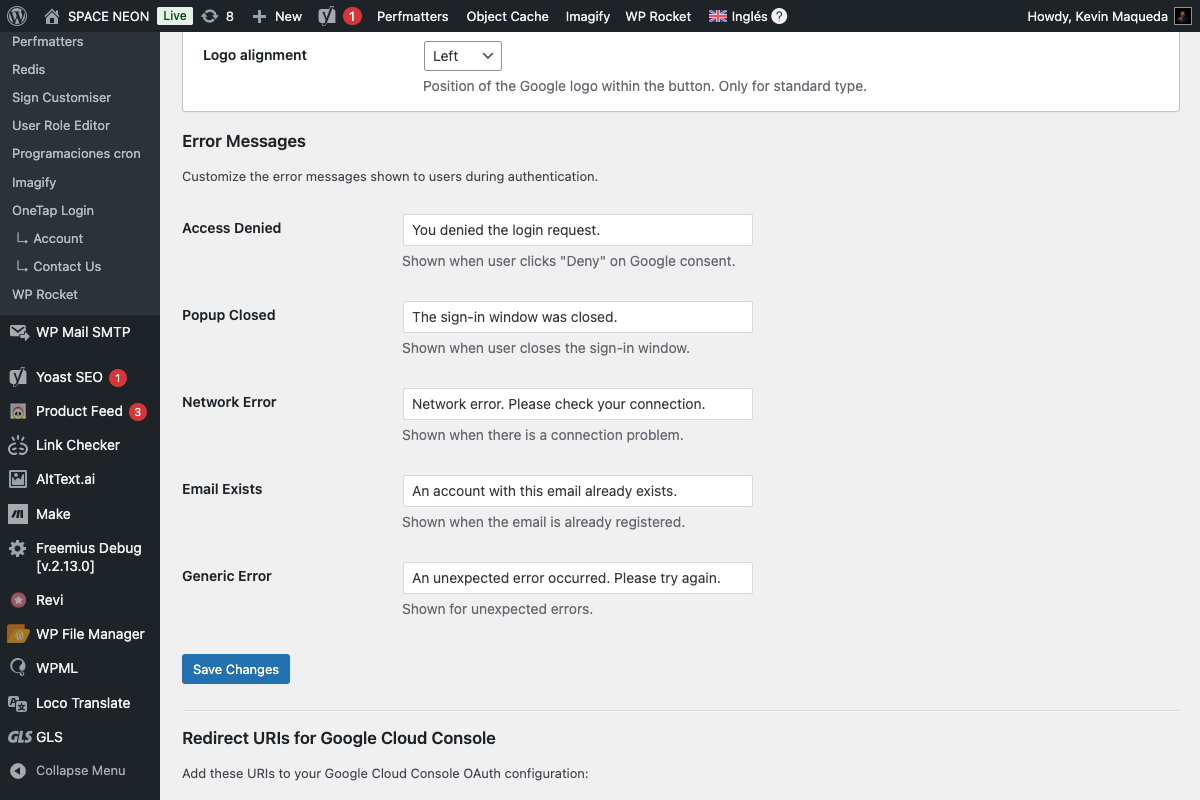
Customizing Messages
- Enter your custom message in each field
- Keep messages clear and actionable
- Consider your brand voice
- Save changes
Custom messages can reduce support requests by giving users clear next steps.
See Error Messages for best practices.
Settings Summary Table
Here's a complete reference of all General tab settings:
| Section | Setting | Type | Default |
|---|---|---|---|
| API | Client ID | Text | (empty) |
| API | Client Secret | Text | (empty) |
| Consent | Respect cookie consent | Select | auto_detect |
| One Tap | Enable One Tap | Checkbox | On |
| One Tap | Auto-select | Checkbox | Off |
| One Tap | Cancel on tap outside | Checkbox | On |
| Button | Enable on My Account | Checkbox | On |
| Button | Enable on Checkout | Checkbox | Off |
| Button | Enable on Cart | Checkbox | Off |
| Button | Enable on wp-login.php | Checkbox | Off |
| Button | Button text | Select | continue_with |
| Button | Theme | Select | filled_blue |
| Button | Shape | Select | pill |
| Errors | Access Denied | Text | "Access was denied..." |
| Errors | Popup Closed | Text | "The sign-in popup..." |
| Errors | Network Error | Text | "Network error..." |
| Errors | Email Exists | Text | "This email is..." |
| Errors | Generic Error | Text | "An error occurred..." |
Saving Settings
After making changes:
- Scroll to the bottom of the page
- Click Save Changes
- Wait for the success message
- Test your changes on the frontend
Settings are only applied after clicking "Save Changes". Navigating away loses unsaved changes.
Next Steps
- User Settings - Configure registration and roles
- Button Customization - Detailed styling options
- Cookie Consent - GDPR compliance configuration